
Getting started with 2D Tilezone
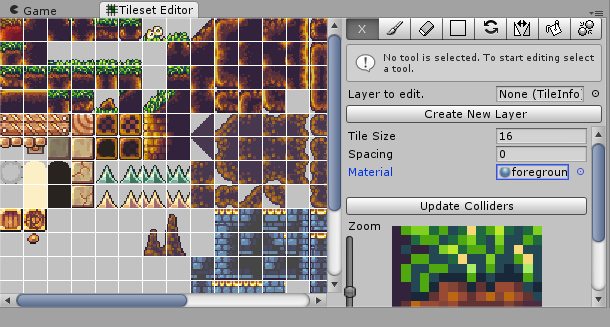
In the Unity editor you will find the main tile editing window under Windows > Tileset Editor. This window can be docked with other windows to save space. Your window should look something like this.
To start using the tileset editor you must first set up a material for the tiles. Create a new material (Assets > Create > Material) and assign a shader to it. The recommended shader to use is Unlit/Transparent Cutout for scenes that aren't affected by lighting, or Standard with the render mode set to cutout if you want to add in lights to the scene. Set the main texture of the shader to the tilesheet image you want to use. If you don't want to set up a material there is a material already set up called SpritesetMat.
Once you have a material set up, drag it into the box beside Material in the Tileset Editor window and you will see the tiles appear. Before you can create a layer to work on you must set up the tile size and spacing to match the tilesheet image used. You will know you have done this step correctly when the grid matches up with all the tiles in the image.
You can now click on Create New Layer to create a layer to work on. Note that you can extend the map size after you have created it, so don't worry if it is too small. You will now see that the box beside Layer to edit has the layer you just created in it. If you want to edit another layer then either drag the gameObject from the hierarchy to the box under Layer to edit or click the circle beside the box and select the layer from the list. You can now start editing using the tools provided.
The Tools

Various tools are at your disposal for editing the tile map in the scene view.
- Paint Brush Tool: Paint the selected tile(s) directly to the scene.
- Erase Tool: Remove tiles. Works the same as the Box Tool.
- Box Tool: Click and drag on the scene to draw a filled in rectangle of tiles.
- Rotate Tool: Click on a tile to rotate it 90 degrees anti-clockwise. Note that this won't work on an Auto Tile in the scene view. Edit Auto Tiles in the Tileset Editor window.
- Flip Tool: Click on a tile to flip it horizontally. This also won't work on Auto Tiles.
- Fill Tool: Click on a tile to fill in an area of tiles.
- Collisions: This tool is not for editing the scene view. Collisions changes the behaviour of the Tileset Editor window so that when you click on a tile you change the collision data of that tile.
If you have the Paint Brush Tool, the Box Tool, or the Fill tool selected and you hold down shift and click and drag a box on the scene view you will select those tiles for use.
Collisions
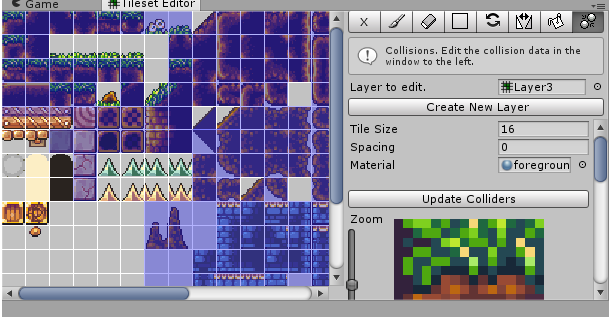
Clicking on a tile in the Tileset Editor window with Collisions selected will toggle through either full collision, slope up right, slope up left, platform, or none. Platform (Top half of the square is blue) will set up the colliders to use Unity's built in Platform Effector 2D component and will set it up for one way collisions.
The collision mesh doesn't get automatically get updated, instead you need to click on Update Colliders. This may take a few seconds with larger maps.
Using the Auto Tile feature
The Auto Tile feature is a powerful feature that allows groups of tiles to connect up with each other in a logical way without you having to individually select each tile image. The Auto Tile feature has been set up in a way that works with most tile formats.
To start using Auto Tile set the Number of Auto Tiles to 1 or higher. An image will appear with a bunch of light grey tiles. These tiles are a general guideline as to what type of tile to place there. To place a tile select a tile or group of tiles from the tilesheet image in the tileset editor window, and click on the appropriate tile in the Auto Tile image. Tiles in the Auto Tile can also be flipped and rotated so you can easily get the tile needed without having to edit the tilesheet image in an external editor.

Notice that in the above image not all the tiles are filled in in the Auto Tile image. This is ok as 2D Tilezone will pick the next best tile. The tiles in the image above is the minimum needed to get good looking results.
Once you have set up your Auto Tile you can select it with the tick box beside the image and draw on to the scene. You can use any of the drawing tools to place Auto Tiles.
- Hide: This button hides the Auto Tiles so you can see the guide image.
- Link With: Chooses which Auto Tiles this Auto Tile links with. You probably at least want it to link with itself.
- Map edge link mode: Choose how the Auto Tile will display for tiles on the edge of the map.
- Auto Tile Type: The type of Auto Tile, either Normal or Isometric Wall.
- Save / Load: Saves or loads Auto Tile data to/from a file.
In the inspector view with a layer selected there are a list of references to other layers. These are for joining layers together and having the Auto Tiles link up between layers.
Other Features
- Update 3D Walls: Check this box to have walls put in the Z direction. These walls will be invisible to the camera but can be used to block light for nice looking shadows, or for colliders if you wish to use 3D physics instead of 2D.
- Export To PNG: Exports the entire map to a PNG image.
To use either Update 3D Walls or Export To PNG the texture used in the material must have read/write checked in the Texture Import settings. This setting can only be seen if you set the texture type to advanced.
Setting up a Pixel Perfect Camera
To set up a Pixel Perfect Camera select the camera you wish to set up and go Add Component > 2D > Pixel Perfect Camera.
- Pixels Per Unit: The amount of pixels per one Unity unit. Set this to the tile size.
- Zoom Factor: How much to zoom in.
Setting up a Parallax Background
To set up a Parallax Background select the Game Object tou wish to set up and go Add Component > 2D > Parallax Background. Once the component Parallax Background is attached you can no longer modify the position of the Game Object usint Transform, instead use Start Position.
- Camera: The camera that this Parallax Background will modify it's position based on.
- Pixel Snap: Check this for pixel perfect accuracy. This will only work if the camera has a Pixel Perfect Camera component added to it.
- Distance: The distance away from the camera. Higher values make objects appear further away in the background. Negative values makes the objects appear closer and actually moves faster than the camera.
- Start Position: Modify this to change the position of the Parallax Background. Trying to move the Game Object manually won't work.
- Privew all Parallax Backgrounds: Selects all the Parallax Backgrounds in the scene and updates their positions in real time so you can see where they all line up. Only the Parallax Backgrounds that are selected will get updated every frame.
If you add a Parallax Background component to a Tile Layer then the only way to edit it is to not have the Parallax Background selected, Otherwise it won't snap to grid.
Setting up a Random Dungeon.
The Random Dungeon feature of 2D Tilezone is aimed at creating random dungeons for a top down Isometric view dungeon, although with some tweaking of settings could also work for other situations like platformer games.
To add a Random Dungeon either create a new layer and select the checkbox for Create Random Dungeon, or add a Random Dungeon object to an exsisting tile layer by going Add Component > 2D > Random Dungeon.
In the inspector in Unity with the Random Dungeon layer selected you will see a bunch of options.
- Width and Height are the width and height in tiles of the Random Dungeon. If this is different from the width and height of the layer created then the layer will automatically update its width and height when the dungeon is generated.
- Wall Height: The height of the walls.
- Scale: The scale of the random noise. Low values will result in big open areas and high valuse will result in smaller areas more crammed together.
- Floor Chance: Higher values means more floor and less walls.
- Stairs Up / Stairs Down are optional references to stair GameObjects to be generated. The references need to be to GameObjects in the scene.
- Random At Start: If checked then a dungeon will be randomly generated when the game starts.
- Update Floor Collider / Update Wall Collider: Wether or not to update the 2D Colliders on generation. On larger layers this will run slow.( only for the generation, once the colliders are generated the performance will be fine )
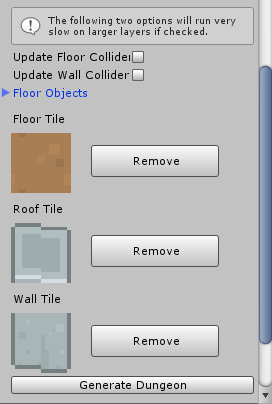
To add the Floor, Roof, or Wall tiles select the tile or Auto Tile wanted and click on the space below the text. The wall tile looks best as an Isometric Wall Auto Tile if the height more than one for an isometric view, or any tile for a top down view with the height at 1.
If the roof or wall tiles are not needed then just leave the tiles as blank, or click Remove.
Floor Objects are objects to be randomly placed on the floor. The chance is the chance that the object will be generated, with 0 being no chance and 1 being certain.
If Must Be Reachable is checked then the object will spawn on any reachable floor space, otherwise the object will spawn on any floor tile.
Setting up a Random Platformer.
The Random Platformer feature of 2D Tilezone is aimed at creating random platform levels.
To add a Random Platformer either create a new layer and select the checkbox for Create Random Platformer, or add a Random Platformer object to an exsisting tile layer by going Add Component > 2D > Random Platformer.
The Random Platformer can be split in to chunks, and to generate a level the bottom left chunk must be selected.
In the inspector in Unity with the Random Platformer layer selected you will see a bunch of options.
- Width and Height are the widht and height of the whole level in chunks.
- Chunk Width and Chunk Height are the width and height in tiles of each individual chunk of the Random Dungeon. If this is different from the width and height of the layer created then the layer will automatically update its width and height when the dungeon is generated.
- Other Platforms: The number of additional platforms to create that aren't part of the solution path.
- Path Height: The height in tiles that must be clear on top of the path so make this number higher than the height of the character.
- Path Thickness: The thickness of the paths generated.
- Solution Distance: The amount of chunks the solution path will try and pass through.
- Scale: The scale of the random noise. Low values will result in big open areas and high valuse will result in smaller areas more crammed together.
- Floor Chance: Higher values means more floor when generating noise.
- Background Chance: Higher values means more background tiles will be generated.
- Entrance and Exit are optional references to GameObjects to be generated, and their position offsets can be set.
- Random At Start: If checked then a dungeon will be randomly generated when the game starts.
- Add Border: If checked a one tile thick border will be added to the level.
- Ladder Layer: The layer that the generated ladder objects will have.
- Update Collider: Wether or not to update the 2D Colliders on generation. On larger layers this will run slow.( only for the generation, once the colliders are generated the performance will be fine )
Floor Objects are objects to be randomly placed on the floor. The chance is the chance that the object will be generated, with 0 being no chance and 1 being certain.
If Must Be Reachable is checked then the object will spawn on the solution path only, otherwise the object will spawn on any platform.
The width for a floor object is the amount of space that the object will take up so objects can't overlap.
Tile Prefabs
To set up Tile Prefabs add the TilePrefabs component by going AddComponent > 2D > Tile Prefabs.
You can add a prefab by clicking on the “+” button beside Tile Prefabs in the inspector, and add tiles to this prefab by clicking the “+” beside Tiles in the inspector.
You can also choose if the tile gets drawn to the tile layer. If the tile doesn't get drawn and the tile has a collision type other than none then the collider will still be created.
Once a tile prefab is set up the prefab will automatically be created and destroyed both in game and in editor when tiles are added or removed.
Using Scriptable Tile Layer
You can add a Scriptable Tile Layer Component to a Tile Layer by going Add Component > 2D > Scriptable Tile Layer or by creating your own script which derives from ScriptableTileLayerBase and adding it to the Tile Layer. You will find some options in the inspector.
Once created you can resize the bounds and chunk size. Your layers will automatically be seperated in to chunks and Autotiles will automatically connect between chunks.
You can also set up additional layers for example a background layer by clicking Add in the inspector, and you can easily switch between which layer you are editing in using the buttons either side of the layer name in the scene view.
Changing tiles in game.
ChangeTile(int x, int y, int index, Tile tile, bool addToChangeList)
ChangeTile(Vector2 worldPos, int index, Tile tile, bool addToChangeList)
In game you can call the method ChangeTile to change a tile.
- int x, int y: x and y index of the tile with 0,0 being the bottom left most tile.
- worldPos: world position containing the tile.
- index: index of the layer with 0 being the first layer created.
- tile: tile to change to. Can also be an Autotile or Tile.empty.
- addToChangeList: If true adds the change to a list of changes. Useful for saving levels.
If you want to easily access tiles in script add a public Tile object. There is a property drawer for the Tile object so you can easily add a tile or Autotile in the inspector in the editor.
Procedural Generation
To gererate a procedural level you must create a new script which derives from ScriptableTileLayerBase or NetworkScriptaleTileLayer and override the GenerateMethod eg
public class WorldGenerator : ScriptableTileLayerBase {

    public override void GenerateMethod (ITilezoneTileDataStream dataStream) {

    }
}
From within GenerateMethod you can edit the dataStream object to generate your level.
Within the ScriptableTileLayerHelper class you will find a bunch of useful static functions for procedural generation.
- FillAllTiles
- FillTiles
- CarveAllTiles
- CarveTiles
To use any of these functions you need to create a function which matches the delegate for TileFunctionDelegate or TileFunctionBoolDelegate.
TileFunctionDelegate returns a Tile and requires int x, int y, and up to 3 parameters of any type.
TileFunctionBoolDelegate returns a bool and requires int x, int y, and up to 3 parameters of any type.
An example of a function is the NoiseFunction which is in the ScriptableTileLayerHelper class and can be used for FillTiles, FillAllTiles, CarveTiles or CarveAllTiles.
public static bool NoiseFunction ( int x, int y, Vector2 scale, Vector2 offset, float chance ) {
    if( Mathf.PerlinNoise( ( x + offset.x ) * scale.x, ( y + offset.y ) * scale.y ) < chance )
            return true;
        return false;
}
An example of how to use the NoiseFunction and FillAllTiles
public class WorldGenerator : ScriptableTileLayerBase {

    public Tile groundTile;
    public Vector2 scale = new Vector2( 0.2f, 0.2f );

    public override void GenerateMethod (ITilezoneTileDataStream dataStream) {
        Random.seed = seed;
        Vector2 offset = Random.insideUnitCircle * 100000;
        ScriptableTileLayerHelper.FillAllTiles(
            dataStream,
            0,
            groundTile,
            ScriptableTileLayerHelper.NoiseFunction,
            scale,
            offset,
            0.5f,
            false
        );
    }
}
When you click Clear and Generate in the inspector or call Generate() from script the level will be generated. Also you can call GenerateSerializedTileData() which will generate the data and return it as a SerializedTileData object. This will not generate the level.
Saving and Loading data.
You can easily save any changes made in game to a file by calling SaveChangesAsDataFile and load by calling LoadChangesDataFile.
For example:
SaveChangesAsDataFile(
	Application.persistentDataPath + "/MyLevel.dat", true
);
LoadChangesDataFile(
	Application.persistentDataPath + "/MyLevel.dat"
);
A Tile Layer can also be saved as a Unity Asset in the editor, and then later be stamped on to a procadural layer by calling StampTileData from ScriptableTileLayerHelper.
Continuous Loading of levels.
If you are generating a large procedural level it might be best to use the Continuous Load feature, which will only load the chunks within view of any players. To use this feature you must have a script which derives from ScriptableTileLayerBase or NetworkScriptaleTileLayer and impliments the ITilezoneContinuousLoad inteface. For examle:
public class WorldGenerator : ScriptableTileLayerBase, ITilezoneContinousLoad {

    Transform[] m_players;
    SerializedTileData m_tileData;

    #region ITilezoneContinousLoad implementation
    public Transform[] players {
        get {
            if( m_players == null || m_players.Length == 0 ) {
                m_players = new Transform[] {
                    GameObject.FindGameObjectWithTag("Player").transform
                };
            }
            return m_players;
        }
    }
    public int viewDistInChunks {
        get {
            return 3;
        }
    }
    public ITilezoneTileDataStream dataToLoad {
        get {
            if( m_tileData == null ) {
                m_tileData = GenerateSerializedTileData();
            }
            return m_tileData;
        }
    }
    #endregion
If you have been generating levels in the editor and are using Continuous Load then don't forget to clear the level before compiling and testing the game, otherwise there will be a pause at the start of the game while it loads the whole level that was saved in memory.
Using Network Scriptale Tile Layer
The NetworkScriptaleTileLayer class can be used in the same way as the ScriptableTileLayerBase class. When using the NetworkScriptaleTileLayer class all tile changes made using ChangeTile are automatically sent over the network and updated on the client.
You can override the method OnRecievedInitialTileData() which gets called on the client once the server has sent the initial tile data. The base implimentation of this method calls UpdateTilesContinuous if ITilezoneContinousLoad is implimented.
Technical Information
When it comes to programming your game you are likely to want some basic information about the tiles. The TileInfo class contains access to a bunch of information and functions to help you. Also contained are functions to modify tiles in game.
Tile class
The Tile class contains information about a single tile.
- int xIndex, yIndex: The x and y position of the tile on the tile sheet. The top left tile is xIndex 0, yIndex 0, and the next tile to the right is xIndex 1, yIndex 0.
- bool flip: Checked if the tile has been flipped horizontally.
- int rotation: The rotation of the tile. 0 = no rotation, 1 = 90 degrees anti-clockwise, 2 = 180 degrees, 3 = 270 degrees anti-clockwise.
- int autoTileIndex: The index of the Auto Tile this tile belongs to, or -1 if this tile isn't an autotile.
- Vector2 GetBottomLeftUV ( TileInfo tileInfo ): Gets the uv of the bottom left of the tile. tileInfo is the map this tile belongs to.
- CollisionType GetCollisionType( TileInfo tileInfo ) gets the collision type of this tile according to the information provided by tileInfo
The Tile class can also be compared to a Vector2 and returns equal if xIndex = Vector2.x and yIndex = Vector2.y. Also Tile can be cast as a Vector2.
TileInfo class
The TileInfo class is automatically attached to any Tile Layer created in the Tileset Editor. The TileInfo class contains information about the whole map and contains an array of Tile objects.
Variables:
- Tile[] tiles: An array of all the tiles.
- int mapWidth, mapHeight: the width and height of the map in tiles.
- int numberOfTiles: The number of tiles not including empty tiles.(read only)
- int tileSize: The size of a tile in pixels.
- int spacing: The amount of space between tiles on the tilesheet.
- CollisionType[] collisions: an array of the collision types for each tile on the tilesheet.
- int numberOfAutotiles: The number of Auto Tiles this map has set up.
- list<string> autoTileNames: List of names for the auto tiles.
- list<int> autoTileLinkMask: List of link bitmasks for the auto tiles.
- list<Tile> autoTileData: List of tile data for the auto tiles.
- list<AutoTileEdgeMode> autoTileEdgeMode: List of edge modes for the auto tiles.
- bool update3DWalls: If checked 3D walls will be updated when UpdateVisualMesh() is called.
- PolygonCollider2D mainCollider: The main 2D collider
- PolygonCollider2D platformCollider: The collider for the platforms effected by PlatformEffector2D
Functions:
- GetMapAtWorldPos( TileInfo[] maps, Vector2 worldPos ): returns the first map found containing worldPos from maps.
- UpdateVisualMesh(): Updates the mesh. Must be called after any modification to the tiles for the modification to be seen.
- AddTile( Vector2 worldPos, Tile selectedTile ): adds a tile to the map at the given world position.
- AddTile( Vector2 worldPos, int autoTileIndex ): adds an AutoTile to the map at the given world position.
- FloodFill ( Vector2 worldPos, Tile[,] selectedTiles, Vector2 originalPos, Tile originalTile ): Performes a flood fill of tiles. Set worldPos and originalPos to the same value for a normal flood fill. selectedTiles is a 2D array of tiles, if only one tile is wanted create a 2D array with both dimensions at length 1.
- FloodFill ( Vector2 worldPos, int autoTileIndex, Vector2 originalPos, Tile originalTile ): Flood fill for Auto Tiles.
- RemoveTile ( Vector2 worldPos ): Removes the tile at the world position.
- RotateTile ( Vector2 worldPos ): Rotates the tile 90 degrees anti-clockwise.
- FlipTile ( Vector2 worldPos ): Flips the tile horizontally.
- ResizeBoundsToFitWorldPos ( Vector2 worldPos ): Resises the bounds to fit the world position. The map has a max size of 64 x 64 tiles.
- UpdateColliders(): Updates the 2D colliders. This might take a second or 2 for larger maps on slower computers.
- WorldPointToMapIndex ( Vector2 worldPos ): Returns the index of the tile at the world position, or -1 if the position is out of the map bounds. This is a quick way of checking if the map contains the position.
- LocalPointToWorldIndex ( Vector2 localPos ): Same as above but for a local position. If you already know that the position is in the map then this is the same as (localPos.y * mapWidth + localPos.x).
PixelPerfectCamera class
PixelPerfectCamera.SnapToPix( Transform transform ) can be called on any transform to snap it to a pixel.